Step1: 生成基本框架
先照着程序🐏的视频做https://www.bilibili.com/video/BV1Yb411a7ty
【踩坑1】注意仓库创建时就要设为public,设置成private会失败
域名强制小写,所以Github名字中的大写字母会转为小写
最后得到一个域名为<Github名字>.github.io的博客,但是无法插入图片并且无法渲染数学公式
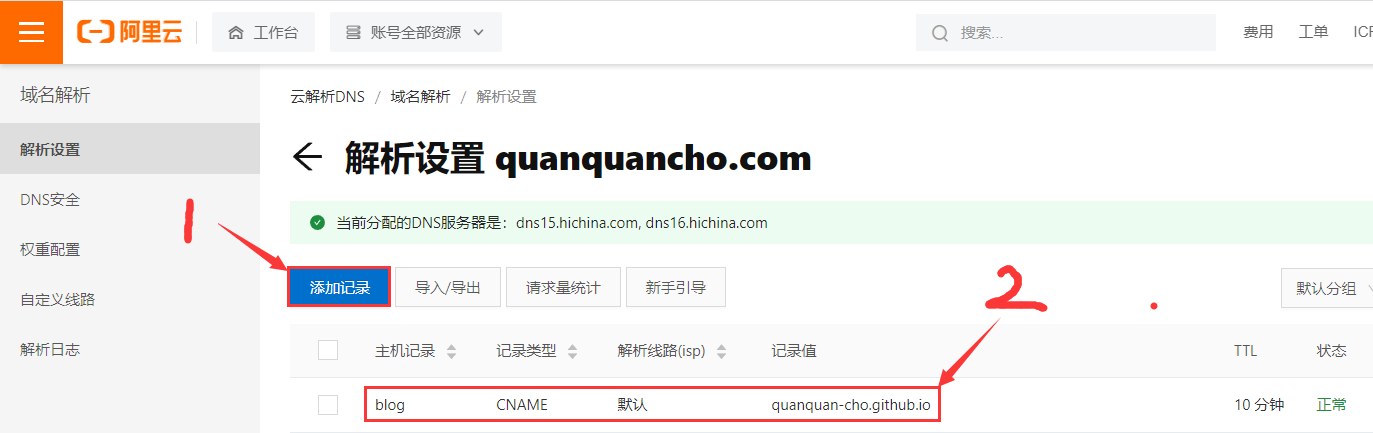
Step2: 切换域名
购买域名
添加CNAME记录
【踩坑2】还需要回到Github仓库进行设置,此步参考https://jeam.xyz/posts/338f9b1.html

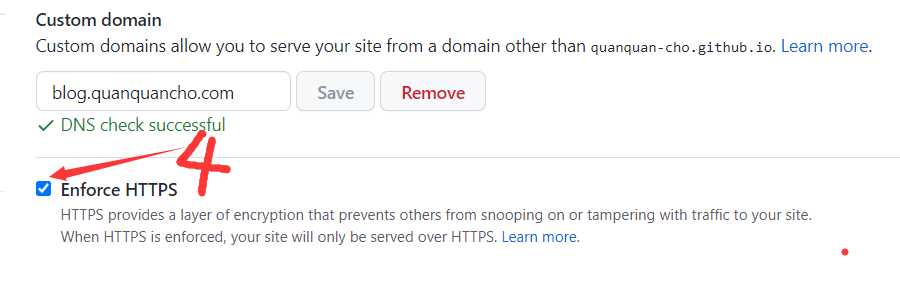
填入域名后等待DNS验证
然后等待TLS证书签发并启用,大概要15min
之后勾选HTTPS服务👇
.
添加CNAME文件,位置如下,否则部署后Github仓库中的设置会还原到以前,此步参考https://jeam.xyz/posts/338f9b1.html
1
2
3
4
5
source
│-- CNAME
└-- _posts
|-- ...
└-- ...
Step3: 更换为NexT主题
Github仓库地址:https://github.com/theme-next/hexo-theme-next
1 | $ cd blog |
更改_config.yml中的主题
1 | theme: next |
Step4: 插入图片
【踩坑3】原本的hexo-asset-image插件有bug,所以要安装修改版的插件,此步参考https://www.bilibili.com/video/BV1D7411U7Yk
1
npm i https://github.com/CodeFalling/hexo-asset-image
更改
_config.yml,打开图片开关
1 | post_asset_folder: true |
【踩坑4】
Typora的md文件中图片引用格式为
<md文件名>.pictures/<图片名>hexo g; hexo s后发现仍然无法显示图片,原因是生成的html文件夹内没有图片于是搓了一个Java程序将
_posts文件夹里的图片拷贝到public内注意:
_posts里的md文件开头必须要有以下注释,这个Java程序是根据date字段的值定位public文件夹路径的1
2
3
4
5
6---
...
date: 2022-06-17 09:32:54
updated: 2022-06-17 09:50:43
...
---如果没有注释,public文件夹的路径就会默认根据md文件的创建时间生成
1
2
3
4
5
6
7
8
9
10
11
12
13
14
15
16
17
18
19
20
21
22
23
24
25
26
27
28
29
30
31
32
33
34public class CopyPictures {
public static void main(String[] args) throws IOException {
int fileCount=0;
int pictureCount=0;
File originDir = new File("source/_posts");
for (File file : originDir.listFiles()) {
if(file.getName().endsWith(".pictures")){
File pictures = new File(file.getAbsolutePath());
String markdownPath = file.getAbsolutePath().replace("pictures", "md");
String createTime = Files.readString(Path.of(markdownPath)).split("date: ")[1].split(" ")[0];
String year = createTime.substring(0,4);
String month = createTime.substring(5,7);
String day = createTime.substring(8,10);
String article = file.getName().replace(".pictures", "");
for (File picture : pictures.listFiles()) {
pictureCount++;
FileInputStream fis = new FileInputStream(picture);
FileOutputStream fos = new FileOutputStream(String.format("public/%s/%s/%s/%s/%s", year, month, day, article, picture.getName()));
byte[] buffer=new byte[1024];
int count;
while ((count=fis.read(buffer,0,buffer.length))!=-1) {
fos.write(buffer,0,count);
}
fis.close();
fos.close();
}
}else if(file.getName().endsWith(".md")){
fileCount++;
}
}
System.out.printf("Successfully copy %d markdown files with %d pictures\n",fileCount,pictureCount);
}
}注意:该Java程序使用了
Files.readString(Path.of("..."))方法读取文件内容,该方法只有**JDK11+**才有如果是JDK8,可以将该方法替换为传统的流式读取文件内容
将该文件放到项目根目录下,然后在项目根目录下执行
1
2
3
4
5
6
7
8$ hexo clean
...
$ hexo g
...
$ java CopyPictures.java
Successfully copy 114 markdown files with 514 pictures
$ hexo s
...成功显示图片
至此,可以在_posts内使用Typora编辑markdown,实现与hexo的无缝衔接
Step5: 渲染数学公式
直接修改theme/next/_config.yml即可
1 | math: |
这里直接使用了默认的hexo-renderer-marked渲染插件
【踩坑5】因为使用hexo-renderer-pandoc插件在hexo g时会有如下报错
1 | $ hexo g |
按照 https://zhuanlan.zhihu.com/p/105986034 的做法安装hexo-math插件重新渲染也无法解决,原因未知
有相同报错的issue: https://github.com/theme-next/hexo-theme-next/issues/1454 ,但是是在hexo s时报错的
Typora中的公式同样使用Mathjax渲染,但hexo-renderer-marked渲染后发现有很多地方与Typora中的不一致,包括但不限于转义符号
| markown源码 | Typora渲染 | hexo-renderer-marked渲染 |
|---|---|---|
 |
花括号 | 空白 |
 |
换行+空白 | 花括号 |
Step6: 设置阅读全文
此时首页里会展示文章的全部内容,非常不美观,需要设置成以下效果👇
.
NexT版本为最新的7.8.0,其他版本方法不同
- ```sh
$ npm install hexo-excerpt1
2
3
4
5
6
7
8
9
2. 根目录`_config.yml`中加入
```yml
excerpt:
depth: 5 # 他的大小就是全文阅读预览长度设置
excerpt_excludes: []
more_excludes: []
hideWholePostExcerpts: true
此步参考 https://blog.csdn.net/CodeJoker_7/article/details/123235687
环境信息
windows 10
Typora for windows(x64)@1.2.5
npm packages
1
2
3
4
5
6
7
8
9
10
11$ npm ls
+-- hexo-asset-image@0.0.5 (git+ssh://git@github.com/CodeFalling/hexo-asset-image.git)
+-- hexo-generator-archive@1.0.0
+-- hexo-generator-category@1.0.0
+-- hexo-generator-index@2.0.0
+-- hexo-generator-tag@1.0.0
+-- hexo-renderer-ejs@2.0.0
+-- hexo-renderer-marked@5.0.0
+-- hexo-renderer-stylus@2.1.0
+-- hexo-server@3.0.0
`-- hexo@6.2.0